Effective tool chest lighting is crucial for any organized workspace, significantly improving visibility and efficiency. There are typically three main types of lighting solutions ideal for tool chests: LED strip lights, magnetic work lights, and under-cabinet puck lights. Each offers distinct advantages depending on your specific needs and the layout of your tool storage.
Why Proper Tool Chest Lighting Matters for Productivity
Good lighting within and around your tool chest isn’t just a luxury; it’s a necessity for precision work and safety. When you can clearly see every tool and component, you reduce the time spent searching, minimize errors, and prevent potential accidents caused by fumbling in dim conditions. This is especially true for small parts or intricate tasks where shadows can obscure critical details. For reviews buying guides on this site.
Investing in quality lighting can also extend the life of your tools by making it easier to spot and address any signs of wear or rust. A well-lit environment encourages better organization, as you’re more likely to return tools to their proper places when they are easily visible.
Types of Lighting Solutions for Tool Chests
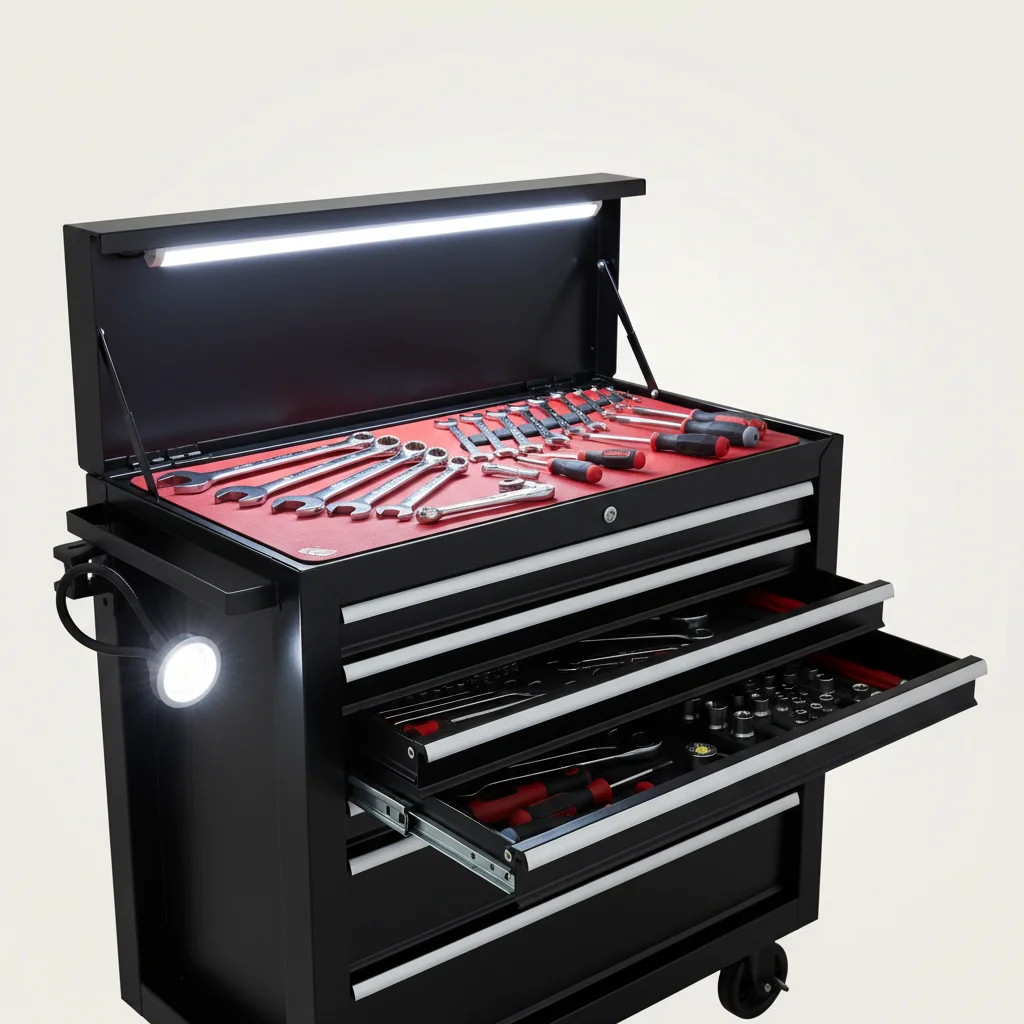
When considering tool chest lighting, several options stand out for their effectiveness and ease of installation. LED strip lights are popular for their slim profile and ability to provide continuous, even illumination across an entire drawer or shelf. They are often adhesive-backed, making installation straightforward.
Magnetic work lights offer versatility, allowing you to reposition them as needed for focused illumination on specific areas. These are particularly useful for tasks that require light from different angles. Under-cabinet puck lights, while typically round, can also be adapted for tool chests, providing concentrated light in smaller compartments or for accentuating specific sections.
- LED Strip Lights: Ideal for even, continuous illumination in drawers.
- Magnetic Work Lights: Flexible and repositionable for targeted lighting.
- Under-Cabinet Puck Lights: Great for focused light in smaller compartments.
- Rechargeable Task Lights: Portable and useful for various applications.
- Motion-Activated Lights: Energy-efficient, turning on only when needed.
Installation Tips for Optimal Illumination
|
Our Picks for the Best Tool Chest in 2026
As an Amazon Associate I earn from qualifying purchases.
|
||
| Num | Product | Action |
|---|---|---|
| 1 | Workington Portable Metal Tool Chest with 9 Drawers, 24" 9-Drawer Tool Chest Cabinet with Ball Bearing Drawer Slides, Steel Tool Storage Box Organizer 4006 Black |

|
| 2 | Goplus Rolling Tool Chest, 5-Drawer Tool Box Organizer w/Lockable Wheels & Sliding Drawers & Detachable Top & Adjustable Shelf, Tool Storage Cabinet for Garage Workshop (Red+Black) |
|
| 3 | IRIS USA Screw Tool Organizer Small Parts Cabinet, 44-Drawer, Electronics Hardware Nuts and Bolts Plastic Storage Drawers Garage Storage, Stackable Bead Craft Organizer Building Bricks Sorter, Black |
|
| 4 | Goplus 5-Drawer Rolling Tool Chest, Tool Storage Box, Removable Tool Cabinet, Sliding Metal Organizer w/Lockable Drawers (Classic Black) |
|
| 5 | Road DAWG ATBT1204D-BLACK Torin Rolling Garage Workshop Tool Organizer: Detachable 4 Drawer Tool Chest with Large Storage Cabinet and Adjustable Shelf, Black |
|
| 6 | Goplus Rolling Tool Chest, 5-Drawer Tool Box Organizer w/Lockable Wheels & Sliding Drawers & Detachable Top & Adjustable Shelf, Tool Storage Cabinet for Garage Workshop(Gray) |
|
| 7 | Keter Stack-n-Roll Modular Tools Organizer for Garage Storage and DIY, 3 Piece Resin Rolling Tool Box System for Small Parts, Black |
|
| 8 | Goplus Rolling Tool Chest, 5-Drawer Tool Box Organizer w/Lockable Wheels & Sliding Drawers & Detachable Top & Adjustable Shelf, Tool Storage Cabinet for Garage Workshop (Blue) |
|
| 9 | Workington Portable Metal Tool Chest with 6 Drawers, 24" 6-Drawer Tool Chest Cabinet with Ball Bearing Drawer Slides, Steel Tool Storage Box Organizer 4005 Black |
|
| 10 | Workington Professional Industrial Portable Metal Tool Chest with 6 Drawers, 26" 6-Drawer Tool Chest Cabinet with Ball Bearing Drawer Slides, Steel Tool Storage Box Organizer 4015 Black |
|
Proper installation is key to maximizing the benefits of your tool chest lighting. For LED strips, ensure the surface is clean and dry before applying the adhesive. Run the wiring discreetly along the back or sides of the chest to maintain a tidy appearance and prevent snagging. Consider using wire clips or ties to secure any loose cables.
When placing magnetic lights, experiment with different positions to find the angle that best eliminates shadows. For battery-operated options, choose locations that are easily accessible for battery changes. Always test your lighting setup before committing to a permanent installation to ensure it meets your visibility requirements.
Powering Your Tool Chest Lights: Wired vs. Battery
The choice between wired and battery-powered lighting depends on your workshop setup and preference. Wired lights, often powered by an AC adapter, provide consistent, bright illumination without the need for battery replacements. They are ideal for stationary tool chests where a power outlet is readily available.
Battery-powered lights offer greater flexibility and portability, making them suitable for tool chests that are frequently moved or for areas without convenient power access. While they require periodic battery changes or recharging, many modern options feature long-lasting LED technology and energy-efficient designs.
Maintaining Your Lighting System for Longevity
To ensure your tool chest lighting system continues to perform optimally, regular maintenance is essential. Periodically clean the light covers and bulbs to remove dust and grime, which can diminish light output. For wired systems, check the connections for any signs of wear or damage.
If using battery-powered lights, keep spare batteries on hand or ensure rechargeable units are topped up. Inspect any adhesive strips or magnetic mounts to ensure they are still securely holding the lights in place. Addressing minor issues promptly can prevent larger problems and extend the lifespan of your lighting investment.
Get our weekly buyer guide
Practical specs, not advice. Unsubscribe anytime.