Replacing broken drawer slides on a tool chest is a straightforward repair that restores functionality and improves workshop efficiency. This process typically involves diagnosing the issue, selecting appropriate replacement slides (often ball-bearing slides for smoother operation), gathering essential tools like screwdrivers and a measuring tape, and following a five-step installation procedure. Most repairs can be completed within 1-2 hours, ensuring your tool chest drawers glide smoothly and reliably for years.
Identifying the Problem and Choosing the Right Replacement Slides
Before diving into repairs, accurately diagnosing the issue and selecting appropriate replacement slides is paramount. Common signs of a failing drawer slide include difficulty opening or closing, excessive side-to-side wobble, grinding noises, or the drawer falling out entirely. A thorough inspection can often reveal physical damage, missing ball bearings, or bent components.
Tool chests typically use one of two main types of drawer slides: friction slides or ball-bearing slides. Friction slides, often found on older or entry-level tool chests, operate with steel-on-steel contact, which can be noisier and require more force to open. While robust, they can wear down over time. Ball-bearing slides, on the other hand, utilize small ball bearings for a smoother, quieter, and more effortless operation, and are now the most common type. These can be further categorized by their mounting style (side-mount, undermount) and extension capabilities (full-extension, partial extension). Heavy-duty ball-bearing slides are designed to withstand significant weight, often supporting hundreds of pounds, making them ideal for storing heavy industrial tools. For best reviews roundups on this site.
When selecting new slides, precise measurement is crucial. Measure the length of your existing slides, and ensure the replacement matches this dimension. Opting for slides that are too short will prevent full drawer extension, while overly long slides can lead to instability. Also, consider the weight capacity—your new slides must be able to support the weight of your tools. Look for full-extension slides if you want complete access to your drawer’s contents. While some older tool chests used proprietary slides, many modern units use standard sizes that can be sourced from manufacturers or aftermarket suppliers. If you have a specific brand like Husky, you might need to contact customer service with your model number to find compatible parts, as manufacturing specifications can vary over time.
Tools and Materials You’ll Need
Gathering the correct tools and materials beforehand will ensure a smooth and efficient replacement process.
Essential Tools:
- Replacement Drawer Slides: Ensure they match the length, type, and weight capacity of your old ones.
- Screwdrivers: Both Phillips head and flathead are usually required for various fasteners. A flathead can also assist in prying and releasing tabs.
- Measuring Tape: For accurate measurement of slide length and alignment.
- Level: To ensure new slides are installed perfectly straight and parallel.
- Pencil or Marker: For marking pilot holes and alignment points.
- Mallet or Soft-Face Dead Blow Hammer: Useful for gently tapping stubborn slide components or setting new slides into place.
Optional Tools:
- Drill/Impact Driver: Speeds up the removal and installation of screws.
- Rivet Gun and Drill Bits: If your old slides are riveted to the tool chest or drawer, you’ll need to drill out the old rivets and install new ones. A burr can also be used to remove rivet heads.
- Shims: Small pieces of wood or plastic can help correct minor alignment issues or compensate for uneven surfaces.
- Safety Glasses and Gloves: Always recommended for personal safety.
Step-by-Step Guide to Replacing Tool Chest Drawer Slides
Replacing your tool chest drawer slides typically involves a series of straightforward steps.
Step 1: Prepare the Workspace and Remove the Drawer
|
Our Picks for the Best Tool Chest in 2026
As an Amazon Associate I earn from qualifying purchases.
|
||
| Num | Product | Action |
|---|---|---|
| 1 | Goplus Rolling Tool Chest, 5-Drawer Tool Box Organizer w/Lockable Wheels & Sliding Drawers & Detachable Top & Adjustable Shelf, Tool Storage Cabinet for Garage Workshop(Gray) |

|
| 2 | Workington Portable Metal Tool Chest with 9 Drawers, 24" 9-Drawer Tool Chest Cabinet with Ball Bearing Drawer Slides, Steel Tool Storage Box Organizer 4006 Black |
|
| 3 | Workington Portable Metal Tool Chest with 6 Drawers, 24" 6-Drawer Tool Chest Cabinet with Ball Bearing Drawer Slides, Steel Tool Storage Box Organizer 4005 Black |
|
| 4 | Goplus 5-Drawer Rolling Tool Chest, Tool Storage Box, Removable Tool Cabinet, Sliding Metal Organizer w/Lockable Drawers (Classic Black) |
|
| 5 | Keter Stack-n-Roll Modular Tools Organizer for Garage Storage and DIY, 3 Piece Resin Rolling Tool Box System for Small Parts, Black |
|
| 6 | Road DAWG ATBT1204D-BLACK Torin Rolling Garage Workshop Tool Organizer: Detachable 4 Drawer Tool Chest with Large Storage Cabinet and Adjustable Shelf, Black |
|
| 7 | Goplus Rolling Tool Chest, 5-Drawer Tool Box Organizer w/Lockable Wheels & Sliding Drawers & Detachable Top & Adjustable Shelf, Tool Storage Cabinet for Garage Workshop (Red+Black) |
|
| 8 | Workington Professional Industrial Portable Metal Tool Chest with 6 Drawers, 26" 6-Drawer Tool Chest Cabinet with Ball Bearing Drawer Slides, Steel Tool Storage Box Organizer 4015 Black |
|
| 9 | IRIS USA Screw Tool Organizer Small Parts Cabinet, 44-Drawer, Electronics Hardware Nuts and Bolts Plastic Storage Drawers Garage Storage, Stackable Bead Craft Organizer Building Bricks Sorter, Black |
|
| 10 | Goplus Rolling Tool Chest, 5-Drawer Tool Box Organizer w/Lockable Wheels & Sliding Drawers & Detachable Top & Adjustable Shelf, Tool Storage Cabinet for Garage Workshop (Blue) |
|
Start by completely emptying the contents of the affected drawer to make it lighter and easier to handle. Next, fully extend the drawer. Most modern ball-bearing slides feature release tabs or levers on each side. To disengage these, you typically push one tab up and the other down simultaneously, allowing the drawer to be pulled free from the cabinet. Some older models may require you to lift the drawer at an angle or use a feeler gauge-like tool to release internal catches. Carefully set the drawer aside in a safe, stable location. If you need more room to work, consider removing adjacent drawers as well.
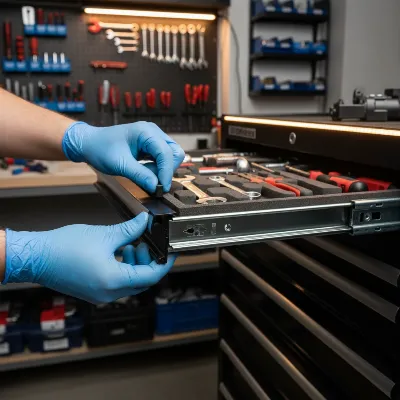 Technician removing a tool chest drawer with release tabs for slide replacement
Step 2: Detach the Old Slides
Once the drawer is removed, you will have better access to the old, broken slides.
- From the Drawer: The drawer-side component of the slide is typically attached with screws. Unscrew all fasteners holding the slide to the side of the drawer. For some designs, you might need to press a square tab and use a mallet to unclip the slide from the drawer.
- From the Tool Chest: Similarly, unscrew the cabinet-side component of the slide from the inside of the tool chest. If screws are hidden or difficult to access, a flathead screwdriver can sometimes be wedged between the slide and the cabinet to lift and unlatch it. For cases where rivets were used instead of screws, you will need to drill out the rivet heads using an appropriate drill bit or burr, then push the rivet body through. Keep any reusable screws organized if you plan to use them with the new slides, although new slides often come with their own hardware.
Step 3: Install the New Slides onto the Drawer
New drawer slides usually come as a single unit but can be separated into their individual components—one part attaches to the drawer, and the other to the cabinet. Separate the drawer-side component from the main slide assembly. Carefully align this component with the pre-drilled holes on the side of your drawer, or mark new pilot holes if necessary. Ensure the slide is oriented correctly (it should extend towards the front of the drawer). Secure it in place with screws, being careful not to overtighten them, which could strip the material or deform the slide. If your original slides were riveted, use the supplied rivets and a rivet gun to attach the new slide part to the drawer.
Step 4: Mount the New Slides to the Tool Chest
Now, turn your attention to the interior of the tool chest. Take the cabinet-side components of your new slides. Accurate placement is critical for smooth drawer operation. Measure carefully to ensure the new slide is installed level and parallel to the corresponding slide on the other side. Use a pencil to mark the screw positions. Many slides have slotted holes, which allow for slight adjustments during installation. Start by securing the back of the slide first, ensuring it matches up with any grooves or mounting points, then snap the front into place. Fix the new slides firmly with screws, again avoiding overtightening. If the cabinet surface is uneven, small shims can be placed between the slide and the cabinet to achieve perfect alignment and ensure the slides are perpendicular to the cabinet’s face.
Step 5: Reinstall and Test the Drawer
With both parts of the new slides installed, it’s time to reinstall the drawer. Carefully align the drawer-side slide components with the cabinet-side components. Gently push the drawer back into the tool chest until the release tabs engage and it slides smoothly into place. Open and close the drawer several times to test its movement. It should glide effortlessly and close flush with the tool chest frame. If you encounter any sticking, resistance, or misalignment, loosen the screws slightly and make minor adjustments to the slide positions, re-tightening once satisfied with the operation. This iterative adjustment ensures a perfect fit.
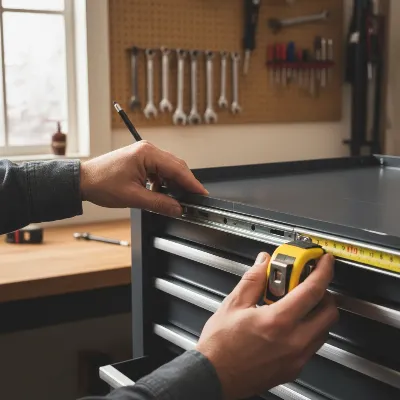 Hands installing and aligning a new drawer slide on a tool chest
Maintaining Your Tool Chest Slides for Longevity
Proper maintenance can significantly extend the life of your tool chest drawer slides and prevent premature failure.
- Regular Cleaning: Over time, dust, debris, and grime can accumulate in the slide mechanisms, hindering smooth operation. Periodically remove your drawers and wipe down the slides with a clean cloth.
- Lubrication: Apply a dry lubricant, such as silicone spray or PTFE-based lubricant, to the moving parts of the slides. Avoid using grease or oil, as these can attract more dirt and dust. Regular lubrication ensures the ball bearings glide freely and reduces friction.
- Prevent Overload: Each drawer slide has a maximum weight capacity. Consistently overloading drawers can bend slides, damage ball bearings, and lead to early failure. Distribute heavy tools across multiple drawers or use tool chests with higher weight-rated slides for heavier items.
- Periodic Inspection: Regularly check your drawer slides for any signs of wear, loose screws, or rust. Addressing minor issues like tightening screws or applying rust preventative early can prevent more significant problems down the line.
“A well-maintained tool chest is a happy tool chest. Don’t wait for a complete failure; a few minutes of care can save you hours of repair.” – Admin, ReviewsVeryD.com, Tool & Equipment Technician
Conclusion
Replacing broken drawer slides on your tool chest might seem daunting, but by following these detailed steps, you can restore your storage unit to its optimal functionality. From accurately identifying the type of slides you need to carefully installing and aligning the new components, this guide provides the practical knowledge to tackle this common workshop repair. A properly functioning tool chest not only enhances your workflow but also extends the life of your valuable tools by keeping them organized and accessible. Don’t let a faulty drawer slow you down; empower yourself with the skills to keep your workshop running smoothly. What’s the next tool chest improvement you’re ready to tackle?
Frequently Asked Questions
How do I know what size drawer slide to buy?
Measure the length of your existing drawer slide from end to end when fully closed. This measurement, usually in inches or millimeters, will be the critical dimension for your replacement slides. Also, consider the depth of your tool chest drawer to ensure the new slides allow for full extension.
Can I replace friction slides with ball-bearing slides?
While technically possible, it requires careful consideration. Ball-bearing slides might have different mounting hole patterns and require more precise alignment. You’ll need to ensure the new ball-bearing slides fit the available space and that you can adapt the mounting points on both the drawer and the tool chest frame.
What if my drawer slides are riveted?
If your old drawer slides are attached with rivets, you’ll need a drill to carefully drill out the rivet heads. Use a drill bit slightly larger than the rivet’s shaft. Once the head is removed, the rest of the rivet can usually be pushed out. You’ll then use a rivet gun and new rivets to install the replacement slides.
Why do my new drawer slides still stick?
New slides might stick due to misalignment. Ensure they are installed level and parallel to each other on both the drawer and the cabinet. Loosen the screws, make small adjustments, and re-tighten. Sometimes, a lack of lubrication or minor debris from installation can also cause initial sticking; a quick clean and dry lubricant application can help.
How do I remove a drawer from a tool chest without visible tabs?
Older tool chests, especially those with friction slides or certain proprietary designs, may not have obvious release tabs. You might need to fully extend the drawer and look for small levers, pins, or angled catches that require a flathead screwdriver or specific tool (like a thin shim or feeler gauge) to disengage. Consult your tool chest’s manual or search online for instructions specific to your brand and model.
Frequently Asked Questions
How do I determine the correct size for replacement drawer slides?
Measure the length of your existing drawer slide from end to end when fully closed. This measurement, typically in inches or millimeters, is crucial for replacement. Also, consider the depth of your tool chest drawer to ensure the new slides allow for full extension.
Is it possible to upgrade from friction slides to ball-bearing slides?
Yes, it is technically possible to upgrade from friction slides to ball-bearing slides, but it requires careful consideration. Ball-bearing slides often have different mounting hole patterns and demand more precise alignment. You must ensure the new slides fit the available space and that you can adapt the mounting points on both the drawer and the tool chest frame.
What should I do if my tool chest drawer slides are riveted?
If your old drawer slides are attached with rivets, you will need a drill to carefully drill out the rivet heads. Use a drill bit slightly larger than the rivet's shaft. Once the head is removed, the rest of the rivet can usually be pushed out, and you can then use a rivet gun with new rivets to install the replacement slides.
Why do newly installed drawer slides sometimes still stick or resist?
New slides might stick primarily due to misalignment. Ensure they are installed perfectly level and parallel to each other on both the drawer and the cabinet. Loosen screws, make small adjustments, and re-tighten. Sometimes, minor debris from installation or a lack of initial lubrication can also cause sticking; a quick clean and application of dry lubricant can help.
How can I remove a tool chest drawer if there are no visible release tabs?
For older tool chests or specific proprietary designs without obvious release tabs, fully extend the drawer and look for small levers, pins, or angled catches. These may require a flathead screwdriver, a thin shim, or a feeler gauge to disengage. Consulting your tool chest's manual or searching online for instructions specific to your brand and model is recommended.
Replace Tool Chest Drawer Slides
This guide outlines the steps to replace broken drawer slides on your tool chest, restoring smooth operation and extending the life of your storage unit.
Empty the drawer completely. Extend the drawer fully and locate the release tabs or levers on modern ball-bearing slides; push one tab up and the other down simultaneously to disengage. Carefully remove the drawer and set it aside in a safe, stable location.
Unscrew all fasteners holding the drawer-side component of the old slide to the drawer. Then, unscrew the cabinet-side component from the inside of the tool chest. If rivets were used, drill out the rivet heads and push the rivet body through.
Separate the drawer-side component from the new slide assembly. Align it with the pre-drilled holes on the drawer, or mark new pilot holes. Ensure correct orientation and secure it with screws, being careful not to overtighten. Use a rivet gun if your original slides were riveted.
Take the cabinet-side components of the new slides. Measure carefully to ensure the new slide is installed level and parallel to the corresponding slide on the other side. Mark screw positions, secure the back first, then the front, and firmly fix with screws. Use shims if the cabinet surface is uneven for perfect alignment.
Align the drawer-side slide components with the cabinet-side components and gently push the drawer back into the tool chest until it engages. Open and close the drawer several times to test its movement. If sticking occurs, loosen screws, make minor adjustments, and re-tighten until smooth operation is achieved.
Get our weekly buyer guide
Practical specs, not advice. Unsubscribe anytime.
I finally got around to replacing the slides on my old Craftsman chest, and this guide was a lifesaver. The five-step installation procedure was super clear, and I appreciated the tip about using ball-bearing slides for a smoother action. My drawers glide like new now, no more wrestling with them every time I need a wrench. Definitely worth the hour it took!
This was really helpful for tackling the grinding noises coming from my main workbench chest. I was a bit intimidated at first, but the instructions made it pretty straightforward. My only minor complaint is that it didn’t emphasize enough how important it is to get the exact length right, I had to double-check my measurements a few times. Still, a solid guide.
I followed the steps to replace a broken slide on my Husky chest. The process was mostly easy, but I found that gathering essential tools like screwdrivers and a measuring tape was a bit more involved than just grabbing them. A quick mention of needing a drill for some slide types would have been useful. It works, but took me a little longer than expected.
My biggest issue was a drawer that kept falling out, and I thought I’d have to buy a whole new chest. Glad I found this first! The section on identifying the problem and choosing the right replacement slides was spot on. It really helped me understand what I needed. Now my tools are secure and accessible again.