A well-organized tool chest is the mark of an efficient craftsman, yet often, the drawers themselves suffer from the chaos of loose tools. Tools clatter, scratch, and shift, leading to damage and wasted time searching for the right implement. Lining your tool chest drawers is a simple, affordable, and transformative project that not only protects your valuable tools and the chest itself but also elevates your workshop’s organization and functionality. This comprehensive guide will walk you through everything you need to know, from selecting the ideal materials to precise installation and smart maintenance tips, ensuring your tool chest drawers are perfectly lined and ready for action.
Why Drawer Liners Are Essential for Every Tool Chest
Drawer liners are more than just an aesthetic upgrade; they are a fundamental component of effective tool storage and maintenance. Understanding their benefits highlights why this project is a must for any serious DIYer or professional technician.
Protecting Your Investment
|
Our Picks for the Best Tool Chest in 2026
As an Amazon Associate I earn from qualifying purchases.
|
||
| Num | Product | Action |
|---|---|---|
| 1 | Goplus Rolling Tool Chest, 5-Drawer Tool Box Organizer w/Lockable Wheels & Sliding Drawers & Detachable Top & Adjustable Shelf, Tool Storage Cabinet for Garage Workshop (Red+Black) |

|
| 2 | Keter Stack-n-Roll Modular Tools Organizer for Garage Storage and DIY, 3 Piece Resin Rolling Tool Box System for Small Parts, Black |
|
| 3 | Goplus Rolling Tool Chest, 5-Drawer Tool Box Organizer w/Lockable Wheels & Sliding Drawers & Detachable Top & Adjustable Shelf, Tool Storage Cabinet for Garage Workshop (Blue) |
|
| 4 | Road DAWG ATBT1204D-BLACK Torin Rolling Garage Workshop Tool Organizer: Detachable 4 Drawer Tool Chest with Large Storage Cabinet and Adjustable Shelf, Black |
|
| 5 | Workington Professional Industrial Portable Metal Tool Chest with 6 Drawers, 26" 6-Drawer Tool Chest Cabinet with Ball Bearing Drawer Slides, Steel Tool Storage Box Organizer 4015 Black |
|
| 6 | Goplus Rolling Tool Chest, 5-Drawer Tool Box Organizer w/Lockable Wheels & Sliding Drawers & Detachable Top & Adjustable Shelf, Tool Storage Cabinet for Garage Workshop(Gray) |
|
| 7 | IRIS USA Screw Tool Organizer Small Parts Cabinet, 44-Drawer, Electronics Hardware Nuts and Bolts Plastic Storage Drawers Garage Storage, Stackable Bead Craft Organizer Building Bricks Sorter, Black |
|
| 8 | Workington Portable Metal Tool Chest with 9 Drawers, 24" 9-Drawer Tool Chest Cabinet with Ball Bearing Drawer Slides, Steel Tool Storage Box Organizer 4006 Black |
|
| 9 | Goplus 5-Drawer Rolling Tool Chest, Tool Storage Box, Removable Tool Cabinet, Sliding Metal Organizer w/Lockable Drawers (Classic Black) |
|
| 10 | Workington Portable Metal Tool Chest with 6 Drawers, 24" 6-Drawer Tool Chest Cabinet with Ball Bearing Drawer Slides, Steel Tool Storage Box Organizer 4005 Black |
|
Every tool in your arsenal represents an investment, and lining your drawers is a direct way to safeguard that investment. Without liners, metal tools bang against the painted or metal surfaces of the drawers, leading to unsightly scratches, chips, and even dulling of precision edges. Liners provide a protective barrier, cushioning tools from impact and preventing abrasive wear. This also extends the life of your tool chest’s finish, preserving its appearance and resale value over time.
Enhanced Organization and Accessibility
One of the most immediate benefits of drawer liners is the significant improvement in organization. Liners, particularly those with a non-slip surface, prevent tools from sliding around as drawers are opened and closed. This keeps each tool in its designated spot, making it quicker and easier to locate what you need. When tools stay put, your drawers remain tidy, reducing clutter and the frustration of rummaging through a disorganized mess. This enhanced accessibility streamlines your workflow and boosts productivity.
Noise Reduction and Stability
The incessant rattling and clanking of tools can be irritating and distracting in a busy workshop. Drawer liners, especially thicker foam or rubber varieties, significantly absorb sound, creating a quieter and more pleasant working environment. Beyond noise reduction, liners add stability. They provide a stable base for tools, preventing them from rolling or shifting, which is particularly beneficial for delicate instruments or those with multiple small components.
Rust Prevention
In humid environments, rust can be a persistent enemy of metal tools. While liners themselves aren’t a standalone rust solution, certain materials and practices can aid in prevention. Some dense foam liners can create a slight barrier against moisture. More importantly, by keeping tools from direct contact with potentially damp metal surfaces, and by allowing for better air circulation when tools are neatly arranged, liners contribute to a drier storage environment. For extreme humidity, consider placing reusable desiccant packs within lined drawers, or opt for traditional methods like felt treated with rust-inhibiting oils.
Choosing the Right Material for Your Tool Chest Drawers
The market offers a variety of drawer liner materials, each with unique properties suited for different needs and budgets. Selecting the right one is crucial for achieving the desired protection, organization, and durability.
Common Liner Types
- Non-Slip Foam/Rubber Liners: These are the most popular choice for tool chests due to their excellent grip, cushioning, and durability. They are typically made from PVC, EVA foam, or a rubber blend. Advantages include superior tool protection, noise dampening, and resistance to common workshop chemicals. They are easy to cut and usually don’t require adhesive. Disadvantages can include a slightly higher cost than basic options, and some cheaper versions might off-gas.
- Kaizen Foam (Custom Cutouts): Kaizen foam, or similar multi-layered closed-cell foam, is ideal for those seeking precision organization. It allows you to create custom cutouts for each tool, providing a shadow board effect directly within the drawer. Advantages are unparalleled organization, secure tool placement, and a professional aesthetic. Disadvantages include higher cost and the significant time investment required for precise cutting and layout.
- Specialty Materials:
- Felt: High-grade felt, sometimes adhesive-backed, was traditionally used for delicate tools, offering a soft, scratch-free surface. However, wool felt can react negatively with steel tools over time, causing rust. Silver chest cloth is a superior alternative if you require a fabric liner.
- Synthetic Suede/Microfiber: These materials offer a luxurious feel and good grip, enhancing the look and function of drawers. They often require spray adhesive for installation.
- DIY Alternatives: For budget-conscious users, materials like non-adhesive shelf liner, carpet remnants, or even heavy-duty cardboard can serve as temporary or low-cost solutions. While they offer some cushioning and a barrier, they generally lack the durability, grip, and chemical resistance of purpose-built tool chest liners.
Comparison of Popular Drawer Liner Materials
| Material Type | Durability | Non-Slip Factor | Ease of Cutting | Cost Range | Best For |
|---|---|---|---|---|---|
| Non-Slip Foam/Rubber | High | Excellent | Easy | Mid | General tool protection, noise reduction, organization |
| Kaizen Foam | High | Excellent | Moderate-Hard | High | Precision organization, custom cutouts |
| Synthetic Suede/Felt | Mid | Good | Easy | Mid-High | Delicate tools, traditional look |
| DIY Shelf Liner | Low-Mid | Mid | Easy | Low | Budget-friendly, temporary solutions |
A Step-by-Step Guide to Lining Your Drawers
Achieving a perfectly lined tool chest is a straightforward process that requires a little preparation, precision, and patience. Follow these steps for a professional finish.
Preparation is Key
Before you even unroll your liner, proper preparation of your drawers is crucial. First, completely empty the drawer you intend to line. This is an excellent opportunity to declutter and sort your tools. Next, thoroughly clean the drawer interior. Use a shop vacuum to remove any debris, dust, or metal shavings. For stubborn grime or grease, use a degreaser or all-purpose cleaner, then wipe down with a damp cloth and ensure the drawer is completely dry before proceeding. Any residual dirt or moisture can compromise the liner’s fit or lead to issues down the line.
Accurate Measurement
Precise measurements are fundamental to a perfect fit. Using a tape measure, measure the length and width of the inside bottom of each drawer. It’s often helpful to measure at a few different points, as drawers might not be perfectly square. Record these measurements carefully. When transferring these to your liner material, remember the advice of seasoned technicians: a slightly loose fit is better than an overly tight one. Many experts recommend leaving a small gap, perhaps 1/16 to 1/8 inch, on each side. This slight allowance makes installation much easier, prevents bunching, and allows the liner to settle without puckering.
Precise Cutting Techniques
With your measurements in hand, it’s time to cut your chosen liner material. For standard non-slip liners, a sharp pair of heavy-duty scissors or a utility knife with a fresh blade will work well.
When cutting, you don’t always need to mark the entire liner with a pen. For straight cuts, align your liner with a straight edge or even the tape measure itself and cut along the line. For larger pieces, especially with foam, a drywall T-square can be an invaluable tool for ensuring perfectly straight, long cuts. If you’re creating custom cutouts with Kaizen foam, plan your tool layout meticulously on the foam surface first, tracing around each tool, before making any cuts. Use a sharp utility knife, making multiple shallow passes rather than one deep cut, to achieve clean edges.
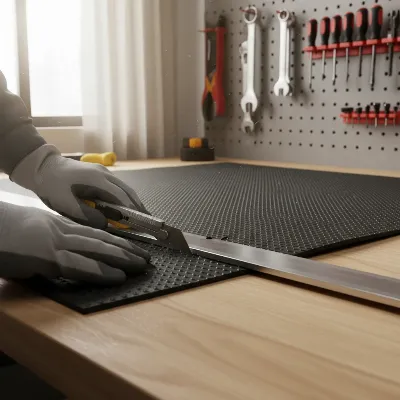 A person precisely cutting a tool chest drawer liner with a utility knife and a straight edge.
Flawless Installation
Installing the cut liner is usually the easiest part. For most non-adhesive non-slip liners, simply roll the cut piece from back to front into the drawer. The slight gap you left during cutting will allow it to unroll smoothly without bunching. Position one long edge against the back of the drawer; this helps keep the liner in place and prevents tools from scratching the back wall when the drawer is quickly closed. Avoid using adhesive unless your liner material specifically requires it (like some felt or suede options) or you are working with custom foam inserts that need to be secured. Standard non-slip liners are designed to stay in place with the weight of the tools and the friction of their material, making them easy to remove and replace if they become soiled or damaged.
Maximizing Organization and Maintenance with Liners
Once your drawers are perfectly lined, you can take your organization to the next level and ensure your setup lasts.
Beyond Basic Lining
- Custom Foam Cutouts: For the ultimate in organization and tool security, consider using Kaizen foam to create custom cutouts for your most frequently used or delicate tools. This not only makes finding tools effortless but also provides an immediate visual inventory, making it clear if a tool is missing. The process involves tracing tools onto the foam and carefully cutting out their silhouettes.
- Using Dividers with Liners: Even with a solid liner, smaller items like sockets, drill bits, or fasteners can still roll around. Integrate drawer dividers or small bins on top of your liner to create compartments for these items. You can even fashion DIY dividers from foam scraps, cutting thin strips and positioning them vertically to create custom-sized sections.
Smart Tool Placement
Thoughtful placement of your tools within the lined drawers can significantly improve efficiency. Group similar tools together (e.g., all wrenches in one drawer, screwdrivers in another). Place tools you use most frequently closer to the front of the drawer for easy access. Consider the size and weight of tools; heavier items might be better suited for lower, more robust drawers, while lighter, precision tools can reside in shallower top drawers.
Liner Care and Replacement
Even the best liners will accumulate dirt, grease, and metal shavings over time. Regularly inspect your liners. When they get dirty, simply remove them, shake off loose debris, and wipe them down with a damp cloth and mild detergent. Ensure they are completely dry before returning them to the drawer. If a liner becomes heavily stained, torn, or starts to degrade (e.g., becoming brittle or losing its non-slip properties), it’s a quick and inexpensive project to replace it. This ensures continuous protection and a clean, organized workspace.
Common Mistakes to Avoid for a Perfect Finish
While lining tool chest drawers is a relatively simple task, avoiding common pitfalls can ensure a truly professional and lasting result.
Rushing Preparation
Skipping the cleaning step or not allowing the drawers to dry completely before installing liners is a common mistake. Any lingering dust, grime, or moisture can trap odors, promote rust under the liner, or prevent the liner from lying flat and securely. Take the time to properly prepare each drawer.
Incorrect Sizing
Cutting liners either too small or too large can undermine the entire effort. Liners that are too small will slide around, defeating the non-slip purpose. Liners that are too large will bunch up, making it difficult to open and close drawers smoothly and creating unsightly wrinkles. Always double-check your measurements and aim for that slight, deliberate gap on the sides.
Using Adhesives Unnecessarily
For most modern non-slip tool chest liners, adhesive is not only unnecessary but can also be detrimental. It makes removal for cleaning or replacement difficult, can leave sticky residues, and may even damage the drawer’s finish. Trust the non-slip properties of the material and the snug, yet slightly gapped, fit to keep your liners in place.
Ignoring Material Suitability
Not all liners are created equal, and choosing the wrong material for your specific needs is a frequent error. Using a thin, flimsy shelf liner for heavy, sharp tools will quickly lead to tears and inadequate protection. Similarly, opting for a material that reacts poorly to oils or chemicals common in your workshop will result in premature degradation. Always match the liner material to the type of tools you store and your working environment.
Conclusion
Lining your tool chest drawers is a small project with a massive impact. By taking the time to select the right material, measure accurately, cut precisely, and install carefully, you transform cluttered, noisy drawers into a beacon of organization and efficiency. This simple upgrade not only safeguards your valuable tools from damage and reduces wear on your tool chest but also creates a more enjoyable and productive workspace. Embrace this DIY task, and you’ll find yourself wondering why you didn’t perfectly line your tool chest drawers sooner. What innovative ways have you found to keep your tools organized and protected?
Frequently Asked Questions
What is the best material for tool chest drawer liners?
The best material generally depends on your needs. Non-slip foam or rubber liners are highly recommended for their durability, cushioning, and grip. For precise organization and a professional look, Kaizen foam for custom cutouts is an excellent, albeit more involved, choice.
Do I need to glue down tool chest liners?
No, for most standard non-slip foam or rubber tool chest liners, adhesive is not necessary. They are designed to stay in place through friction and the weight of the tools. Using adhesive can make future cleaning or replacement difficult.
How do I cut foam perfectly for tool drawers?
To cut foam perfectly, measure your drawer carefully and transfer those measurements to the foam. Use a sharp utility knife or heavy-duty scissors, and employ a straight edge like a drywall T-square for long, precise cuts. For custom tool cutouts, trace your tools before carefully scoring and cutting the foam.
How often should I replace my drawer liners?
The frequency of liner replacement depends on usage and wear. Inspect your liners regularly; if they become heavily soiled, torn, lose their non-slip properties, or show signs of degradation, it’s time to replace them. This is typically an inexpensive and quick process.
Can drawer liners help prevent rust?
While liners are not a primary rust prevention solution, they can contribute. By preventing tools from direct contact with potentially damp metal drawer surfaces and aiding in organized tool placement (which can improve air circulation), they help maintain a drier environment. For humid conditions, consider adding desiccant packs.