A well-organized and smoothly functioning tool chest is the backbone of any productive workshop or garage. Yet, over time, the relentless dust, grime, and heavy loads take their toll, transforming effortlessly gliding drawers into frustrating, sticky struggles. This common issue not only wastes valuable time but also risks damaging your precious tools and the chest itself. As an experienced technician who has evaluated hundreds of tool chests, I understand the critical importance of proper maintenance. This comprehensive guide will walk you through the essential steps to clean, lubricate, and restore your tool chest drawers to optimal working condition, ensuring they remain reliable companions for years to come.
The Lifeline of Your Workshop: Understanding Tool Chest Drawer Slides
Before diving into the cleaning process, it’s crucial to understand the components that make your drawers move: the slides. Tool chest drawers typically rely on one of two main slide types, each with unique characteristics and maintenance needs.
Types of Drawer Slides
|
Our Picks for the Best Tool Chest in 2026
As an Amazon Associate I earn from qualifying purchases.
|
||
| Num | Product | Action |
|---|---|---|
| 1 | Workington Portable Metal Tool Chest with 6 Drawers, 24" 6-Drawer Tool Chest Cabinet with Ball Bearing Drawer Slides, Steel Tool Storage Box Organizer 4005 Black |

|
| 2 | Road DAWG ATBT1204D-BLACK Torin Rolling Garage Workshop Tool Organizer: Detachable 4 Drawer Tool Chest with Large Storage Cabinet and Adjustable Shelf, Black |
|
| 3 | Goplus Rolling Tool Chest, 5-Drawer Tool Box Organizer w/Lockable Wheels & Sliding Drawers & Detachable Top & Adjustable Shelf, Tool Storage Cabinet for Garage Workshop (Red+Black) |
|
| 4 | Goplus Rolling Tool Chest, 5-Drawer Tool Box Organizer w/Lockable Wheels & Sliding Drawers & Detachable Top & Adjustable Shelf, Tool Storage Cabinet for Garage Workshop (Blue) |
|
| 5 | Goplus 5-Drawer Rolling Tool Chest, Tool Storage Box, Removable Tool Cabinet, Sliding Metal Organizer w/Lockable Drawers (Classic Black) |
|
| 6 | IRIS USA Screw Tool Organizer Small Parts Cabinet, 44-Drawer, Electronics Hardware Nuts and Bolts Plastic Storage Drawers Garage Storage, Stackable Bead Craft Organizer Building Bricks Sorter, Black |
|
| 7 | Goplus Rolling Tool Chest, 5-Drawer Tool Box Organizer w/Lockable Wheels & Sliding Drawers & Detachable Top & Adjustable Shelf, Tool Storage Cabinet for Garage Workshop(Gray) |
|
| 8 | Workington Portable Metal Tool Chest with 9 Drawers, 24" 9-Drawer Tool Chest Cabinet with Ball Bearing Drawer Slides, Steel Tool Storage Box Organizer 4006 Black |
|
| 9 | Workington Professional Industrial Portable Metal Tool Chest with 6 Drawers, 26" 6-Drawer Tool Chest Cabinet with Ball Bearing Drawer Slides, Steel Tool Storage Box Organizer 4015 Black |
|
| 10 | Keter Stack-n-Roll Modular Tools Organizer for Garage Storage and DIY, 3 Piece Resin Rolling Tool Box System for Small Parts, Black |
|
Most modern heavy-duty tool chests feature ball-bearing slides. These consist of multiple telescopic sections with small ball bearings that allow for smooth, full extension and heavy load capacities. They are renowned for their robust performance and durability. Older or lighter-duty tool chests often use friction slides, which are simpler metal-on-metal designs that rely on a thin layer of lubrication to reduce friction. While less complex, they can be more prone to sticking if not properly maintained.
Why Drawer Slides Get Stuck
Several factors contribute to stiff or jammed tool chest drawers. The most common culprit is the accumulation of dirt, dust, and metal shavings within the slide mechanisms. These abrasive particles combine with old, dried-out grease or oil to create a sticky, grinding paste. Lack of lubrication is another primary cause, as slides simply cannot operate smoothly without a fresh, appropriate lubricant. Over time, rust or corrosion can form, especially in humid environments, further impeding movement. Less common but equally disruptive are misaligned or bent slides, often resulting from overloading or impacts.
Essential Arsenal: Tools and Materials for Drawer Maintenance
Effective cleaning and lubrication require the right supplies. Gathering these items before you begin will streamline the process and ensure a thorough job.
Cleaning Agents and Tools
You’ll need a robust degreaser to cut through old grease and grime. Options include automotive brake cleaner, citrus-based degreasers, or even strong dish soap and water for lighter buildup. Compressed air is invaluable for blowing out loose debris and drying components. For scrubbing, gather stiff-bristled brushes (an old toothbrush works wonders), lint-free rags or micro-fiber cloths, and Q-tips for reaching tight spots. A screwdriver or small pry tool might be necessary for drawer removal.
Recommended Lubricants
The choice of lubricant is paramount. White lithium grease is a popular and effective option, known for its longevity and ability to handle heavy loads, though it can attract dust if over-applied. Dry lubes with PTFE (Teflon) or silicone-based sprays are excellent choices, as they leave a dry film that resists dust and dirt attraction, making them ideal for dusty environments. For very light-duty or older friction slides, a light machine oil or even stick wax can be considered, but avoid tacky greases that will quickly become contaminated.
A Step-by-Step Guide to Restoring Smooth Movement
Transforming sticky, stubborn drawers into smooth-gliding assets is a methodical process. Follow these steps for optimal results and lasting performance.
Emptying and Initial Assessment
First, completely empty the drawer you intend to service. Remove all tools, liners, and any other contents. This not only lightens the drawer but also provides an unobstructed view of the slides. Take a moment to visually inspect the slides for obvious damage, such as bent sections or excessive rust, and note the extent of dirt and old grease buildup. This initial assessment helps in determining the effort required.
Removing the Drawers
Most modern tool chest drawers are designed for easy removal. Look for small plastic or metal levers on each side of the slide where the drawer meets the cabinet. Typically, you’ll press one lever down and the other up simultaneously, then pull the drawer straight out. For older models or friction slides, it might involve fully extending the drawer and carefully lifting it or manipulating a small tab. If you encounter resistance, consult your tool chest’s manual or look for online videos specific to your model.
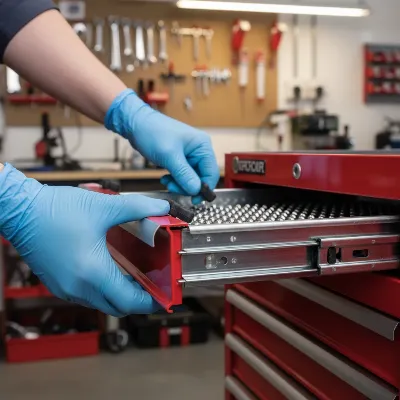 Technician removing a tool chest drawer with a lever mechanism for maintenance
Deep Cleaning the Slides
Once the drawer is removed and the slide members are separated (if applicable), it’s time to clean. Apply your chosen degreaser generously to the slide mechanisms, focusing on the channels where the ball bearings or friction surfaces move. Use your stiff brush and Q-tips to scrub away all traces of old grease, dirt, and grime. Ensure you clean both the drawer-mounted slide member and the cabinet-mounted members thoroughly. After scrubbing, wipe everything down with lint-free rags. For stubborn residue, repeat the degreasing process. Finish by using compressed air to blow out any remaining debris and ensure all parts are completely dry before proceeding. Any residual moisture can lead to rust.
> “In my decade of working with tools, I’ve seen how often a ‘sticky drawer’ is just a ‘dirty drawer.’ A thorough cleaning, removing all the old gunk, is always the first and most crucial step.” – Admin, ReviewsVeryD.com
Applying the Right Lubricant
With the slides sparkling clean and dry, it’s time for lubrication. If using white lithium grease, apply a thin, even film directly to the ball bearings and along the raceways. Avoid over-application, as excess grease will only attract more dirt. For dry lubes or silicone sprays, apply a light, even coat to all moving parts, allowing it a few moments to dry and form its protective film. For friction slides, a very light application of appropriate oil or stick wax along the contact surfaces is sufficient. Remember, the goal is smooth movement, not a thick coating.
Reassembly and Testing
Carefully reinsert the drawer-mounted slide member back into the cabinet-mounted slide, ensuring the levers or tabs engage correctly. It might require a gentle push and wiggle until it clicks into place. Once reassembled, open and close the drawer several times, extending it fully, to distribute the lubricant evenly and confirm smooth operation. Listen for any grinding or sticking sounds. If necessary, make small adjustments or re-apply lubricant in specific spots. Then, carefully put your tools back, taking care not to overload the drawer.
Choosing Your Glide Partner: Selecting the Best Lubricant
The type of lubricant you choose can significantly impact your tool chest’s performance and longevity. Making an informed decision based on your environment and slide type is key.
| Lubricant Type | Pros | Cons | Best For |
|---|---|---|---|
| White Lithium Grease | Excellent load-bearing, long-lasting, versatile | Can attract dust/dirt, can become sticky over time | Heavy-duty ball-bearing slides in relatively clean environments. |
| Dry Lube with PTFE/Teflon | Repels dust and dirt, leaves no wet residue | Less suitable for extremely heavy loads, may require more frequent reapplication | Dusty environments, ball-bearing and friction slides. |
| Silicone Spray | Excellent water resistance, good for plastic/rubber components, repels dust | Less durable under high pressure, can be less lasting than dry lube | General purpose, good for mixed material slides, damp environments. |
| Light Machine Oil | Penetrates well, readily available | Attracts dust, requires frequent reapplication, can drip | Older friction slides, very light-duty applications, short-term fix. |
| Stick Wax/Paraffin | Dry, won’t attract dust, good for wood/metal friction | Limited load capacity, not for ball bearings | Simple friction slides, older wooden drawers. |
For most modern tool chests with ball-bearing slides, a high-quality white lithium grease or a dry lubricant with PTFE will provide the best balance of performance and dust resistance. Avoid general-purpose oils like WD-40 as a primary lubricant; while they can clean, they offer minimal lasting lubrication and attract grime.
Troubleshooting Common Tool Chest Drawer Hiccups
Even with regular maintenance, sometimes drawers can present challenges. Knowing how to diagnose and address these issues can save you frustration and costly repairs.
Stuck or Jammed Drawers
If a drawer remains stuck after cleaning and lubricating, check for obstructions. Tools might have shifted and jammed the mechanism, or foreign objects could be lodged in the slides. Overloading is another common cause; heavy tools can put excessive strain on the slides, especially if they are not rated for the weight. If the slides appear bent or damaged, they may need to be replaced. Some tool chests also have complex locking mechanisms; ensure they are fully disengaged.
Drawers Falling Open
A drawer that rolls open on its own is not only annoying but also potentially dangerous. This usually indicates worn or broken detents. Detents are small mechanisms designed to hold the drawer securely in the closed position. If these are worn, they lose their grip. In some cases, severely overloaded drawers can overcome the detent’s strength. Ensure your tool chest is level, as an uneven surface can also cause drawers to roll open. Replacing the detent mechanism or reducing the drawer’s load can fix this.
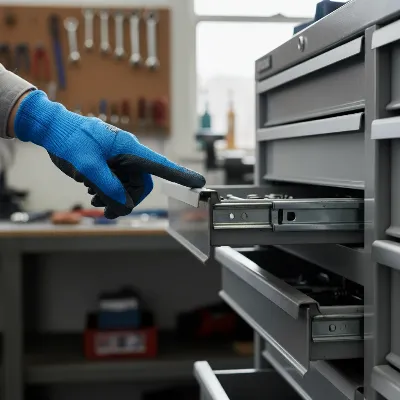 Close-up of a technician inspecting a tool chest drawer slide for damage or misalignment
Misalignment Issues
Drawers that don’t close flush or are difficult to open and close smoothly might be misaligned. This can occur if the chest is on an uneven surface or if it has been moved roughly. To fix, ensure the tool chest is on a level surface. Sometimes, gently wiggling the drawer while pushing it in can help realign the slides. If the mounting screws for the slides are loose, tighten them. In cases of significant damage, the entire slide assembly might need adjustment or replacement.
Longevity Secrets: Tips for Ongoing Tool Chest Maintenance
Maintaining your tool chest is an investment that pays off in efficiency and extended tool life. Proactive measures are always better than reactive repairs.
Regularly empty and inspect your drawers every few months, especially if you work in a dusty environment. This allows you to catch minor issues before they become major problems. Wipe down exposed slide surfaces periodically to prevent buildup. Always avoid overloading drawers beyond their specified weight capacity, as this is a leading cause of slide damage and misalignment. Store your tool chest in a dry, temperate environment to minimize the risk of rust and corrosion. A simple cover can also protect it from shop dust when not in use.
> “A tool chest isn’t just storage; it’s a vital piece of equipment. Treat it with the same care you give your most prized tools, and it will serve you faithfully for decades.” – Admin, ReviewsVeryD.com
Conclusion
Keeping your tool chest drawers clean and properly lubricated is a straightforward yet impactful aspect of workshop maintenance. By understanding the types of slides, using the right cleaning agents and lubricants, and following a systematic approach, you can eliminate frustrating sticky drawers and restore seamless operation. Regular attention to these often-overlooked components not only prolongs the life of your tool chest but also significantly improves your workflow and overall productivity. So, when was the last time you gave your hard-working tool chest the smooth-gliding treatment it deserves?
Frequently Asked Questions
Can I use WD-40 to lubricate my tool chest drawers?
While WD-40 can act as a cleaner to dissolve gunk, it is not an effective long-term lubricant for tool chest drawers. It tends to evaporate quickly and can attract dust and grime, making the problem worse over time. For best results, use a dedicated lubricant like white lithium grease or a dry PTFE spray.
How often should I clean and lubricate my tool chest drawers?
The frequency depends on your usage and environment. For heavy daily use in a dusty workshop, aim for every 3-6 months. For lighter use in a cleaner environment, once a year might suffice. Regular visual inspection is key to determining when maintenance is needed.
Do all tool chest drawers have removable slides?
Most modern tool chests with ball-bearing slides feature a release lever that allows the drawer to be easily removed from the cabinet. Older models or simpler friction slides might not be designed for easy separation, or may require a different method, such as lifting and pulling.
What if my drawer slides are bent or rusted beyond cleaning?
If your drawer slides are significantly bent, severely corroded, or otherwise damaged, cleaning and lubricating might not be enough. In such cases, the best solution is often to replace the damaged slide mechanisms. Many manufacturers offer replacement slides, or you can find universal options.
Is it important to use a dry lubricant in a dusty environment?
Yes, using a dry lubricant (like one with PTFE or silicone) in a dusty environment is highly recommended. Unlike traditional greases or oils, dry lubricants leave a non-tacky film that resists attracting and holding onto airborne dust, metal shavings, and other debris, which helps maintain smooth operation for longer.